How to Reduce Checkout Errors with Google Address Autocomplete
Table of Contents
- Importance of address autocomplete functionality for ecommerce stores
- Why is Google's Address Autocomplete a good solution for merchants?
- 1. Global coverage and accuracy
- 2. Enhanced location intelligence
- 3. Ecommerce optimization
- How to implement Google Address Autocomplete in your WooCommerce store
- Step 1: Retrieve your Google API key and add it to WooCommerce
- Step 2: Add your API key to your WooCommerce store
- Step 3: Setting up Google Address Autocomplete with CheckoutWC
- Step 4: Testing your Address Autocomplete functionality
- Step 5: Customizing Google Address Autocomplete in your WooCommerce store
- Upgrade your WooCommerce checkout experience today
Imagine a customer incorrectly enters their address during checkout, and now their package is heading back to your warehouse instead of their doorstep. This leads to frustrated customers and wasted resources, both of which are avoidable problems! With Google Address Autocomplete in your WooCommerce checkout, you can help customers enter their details accurately the first time.
A feature of the Places library in Google’s Maps JavaScript API, this tool acts like a mini address expert built into your checkout page, quickly populating street addresses, cities, states, and zip codes.
Why is this important? Well, consider these benefits:
- It improves address accuracy, reducing shipping errors.
- It speeds up the checkout process, especially on mobile.
- It lets customers buy with confidence, knowing their address is verified before they complete their purchase.
So, it’s no surprise that a whopping 80% of ecommerce stores have implemented some form of autocomplete functionality, according to research by the Baymard Institute. It’s a big part of creating a smooth, frictionless checkout process.
If you’re running a WooCommerce store and your coding skills are more “Hello World!” than Silicon Valley, the idea of manually integrating this feature might seem scary. But don’t worry! This guide will show you how to implement Google Address Autocomplete step-by-step using CheckoutWC.
The simplicity of Shopify with the power of WooCommerce. Replace your WooCommerce checkout page with CheckoutWC to boost sales and reduce cart abandonment.
Importance of address autocomplete functionality for ecommerce stores
Here’s a closer look at how address autocomplete improves different aspects of your store:
- Ensures successful deliveries: The secret to happy customers? Making sure their packages actually reach them. When shoppers mistype their address or forget their apartment number, it kicks off a whole chain of issues: failed deliveries, returned packages, and the “where’s my stuff?” emails that every customer service representative dreads. Address autocomplete catches these issues right at checkout before they become problems.
- Reduces support workload: How many support tickets did you handle last month about missing packages? If you’re wincing at the number, don’t worry, we’re not judging! With address autocomplete, you’ll spend less time playing detective with incorrect addresses and more time actually running your business.
- Faster checkout completion: Nobody likes typing out their full address, especially on mobile devices. Address autocomplete fills in the details after just a few keystrokes, getting customers through checkout faster.
- Improves data quality for analytics: When your address data is clean and standardized, you can track shipping patterns and optimize your logistics. You’ll also be able to understand where your customers are coming from, make smarter decisions about inventory, and fine-tune your shipping options based on data.
- Personalizes the shopping experience: Accurate location data opens up new ways to serve your customers better. You can show them nearby pickup locations, offer region-specific deals or customize their experience based on their location.
Why is Google’s Address Autocomplete a good solution for merchants?
1. Global coverage and accuracy
If you’re running an international store, Google’s got your back with real-time address data spanning over 250 countries and territories. Their database stays fresh with over 50 million daily updates. This comprehensive global address database ensures your customers’ shipping details are always spot-on, whether they’re ordering from downtown Manhattan or a remote island in Thailand.
2. Enhanced location intelligence
Google’s system doesn’t just know addresses – it knows places. With data for over 250 million locations worldwide, it delivers the full picture.
Every address includes business hours, price level indicators, and user ratings. You’ll even get accessibility information and location-specific details that matter for delivery. Your customers get everything they need without tab-hopping across the internet.
3. Ecommerce optimization
Google built this tool specifically for e-commerce checkouts, offering their Autocomplete with Address Validation SKU at $25 CPM per 1,000 sessions – a significant saving compared to using separate APIs.
The smooth integration between Autocomplete and Address Validation helps decrease cart abandonment, increase customer repeat rates, and catch address errors early in the process. It’s specifically designed for checkout and delivery use cases, helping you reduce costs and avoid customer churn due to incorrect deliveries.
How to implement Google Address Autocomplete in your WooCommerce store
Ready to add Google Address Autocomplete to your store? We’ll walk through the implementation using CheckoutWC!
Step 1: Retrieve your Google API key and add it to WooCommerce
To get started, you’ll need a Google Maps API key. This key allows your website to access Google Maps services, which you’ll need for features like address autocomplete and map displays on your WooCommerce store.
P.S. CheckoutWC’s Address Autocomplete feature won’t work without this key, so it’s pretty important to get this step right.
Here’s how to get your API key:
- Go to the Google Cloud Platform Console and sign in with your Google account.
- Create a new project or select an existing one.
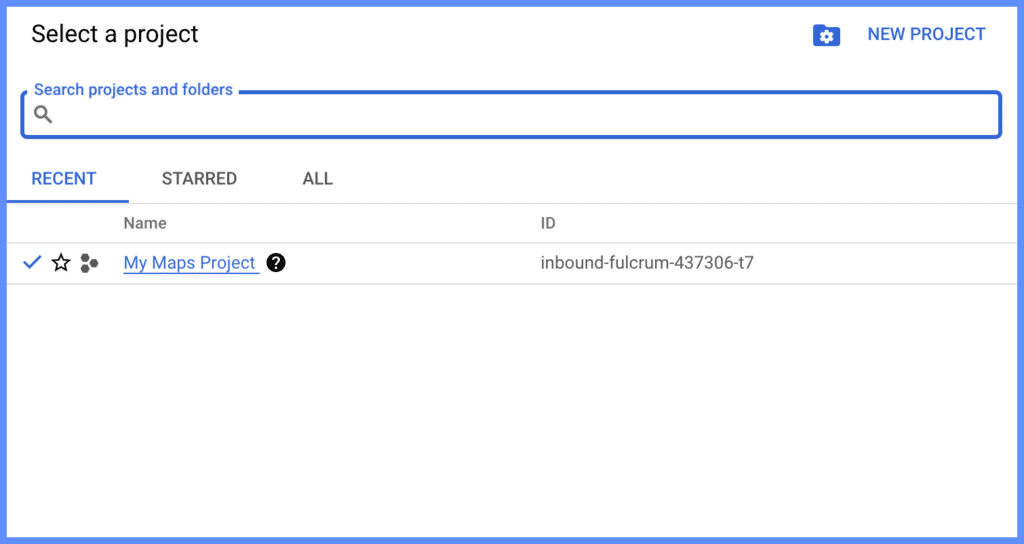
- Navigate to the APIs & Services dashboard and click Enable APIs and Services.

- Search for and enable these three: Maps JavaScript API, Places API, and Geocoding API.

- Go to the Credentials page, click Create Credentials > API Key, and your new API key will appear. Copy it somewhere safe.
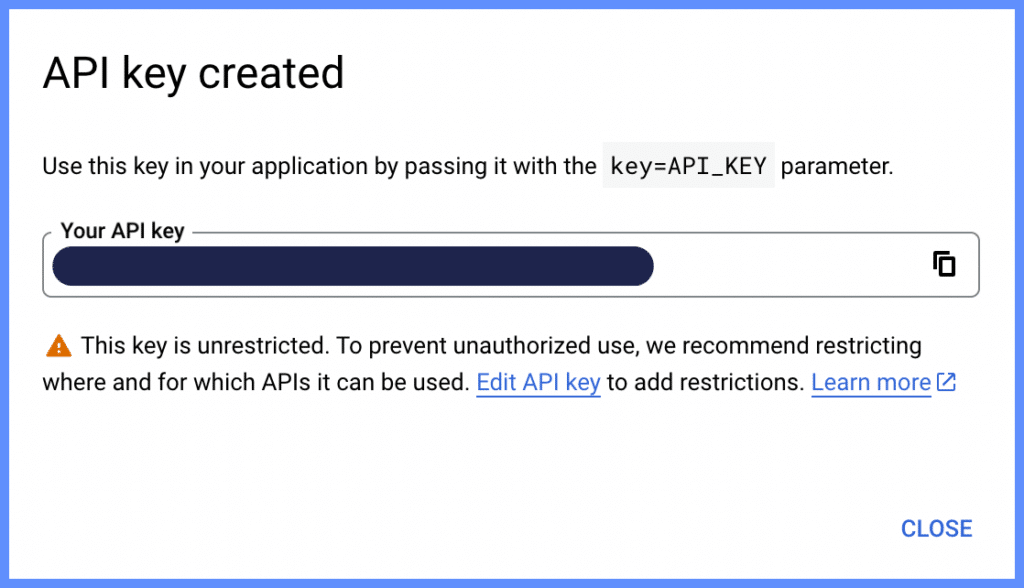
To prevent unauthorized usage and potential billing issues, you must restrict your API key. Here’s how:
- On the Credentials page, click on your new API key. This will take you to the Edit API Key page.
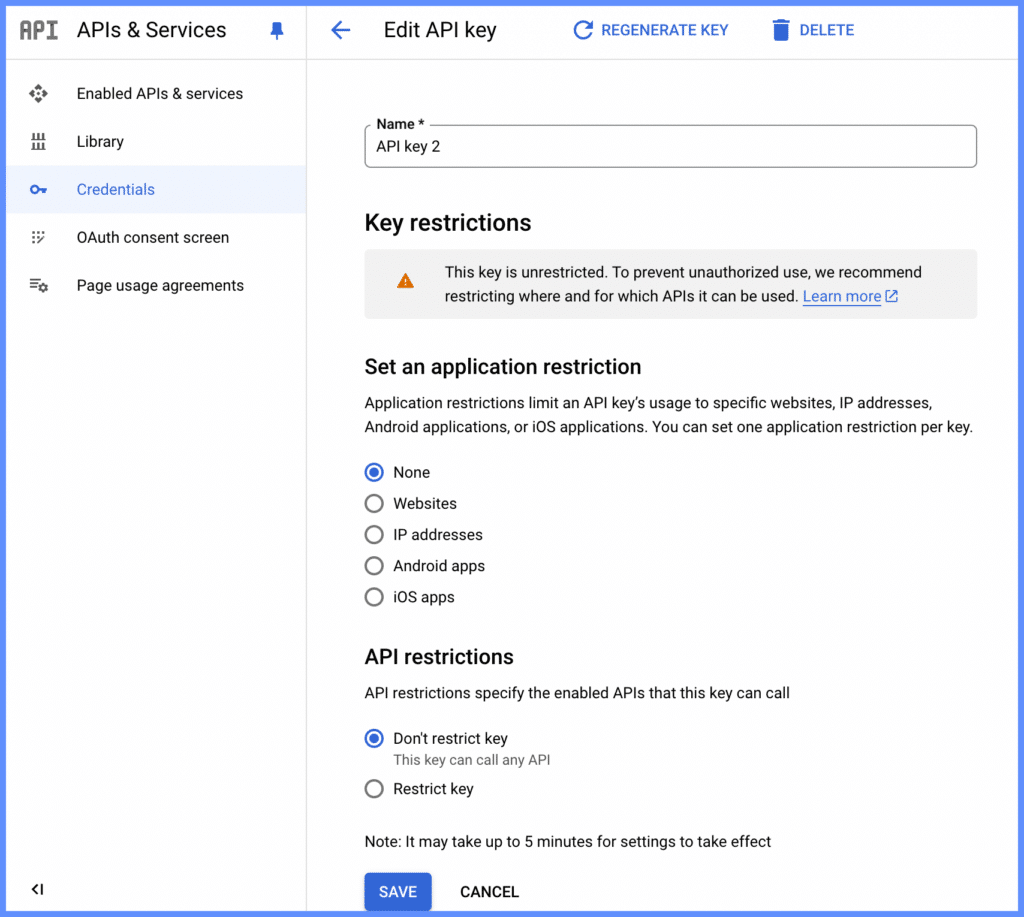
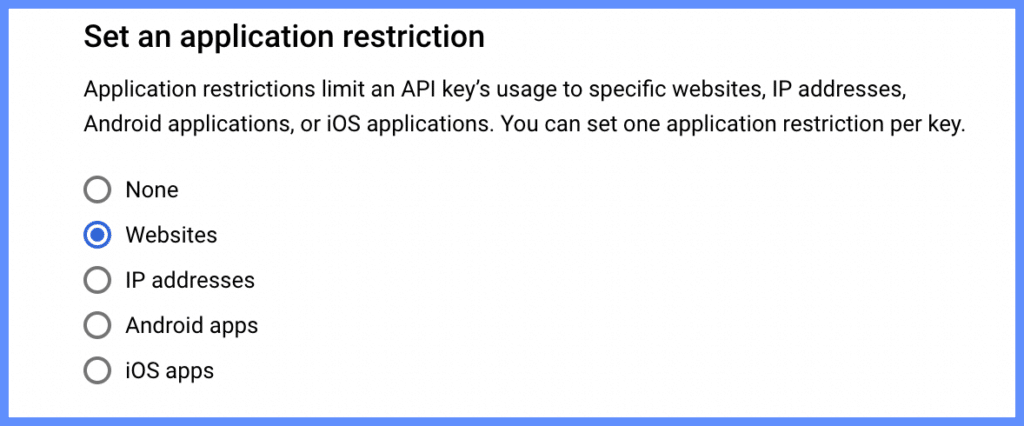
- Under Set an application restriction, select Websites.
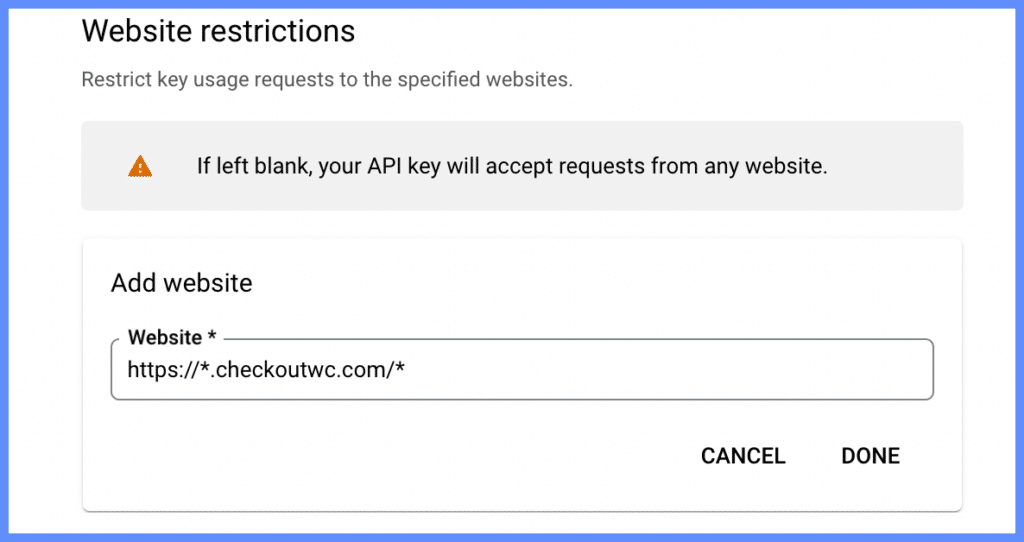
- Add your website’s domain to the allowed list.
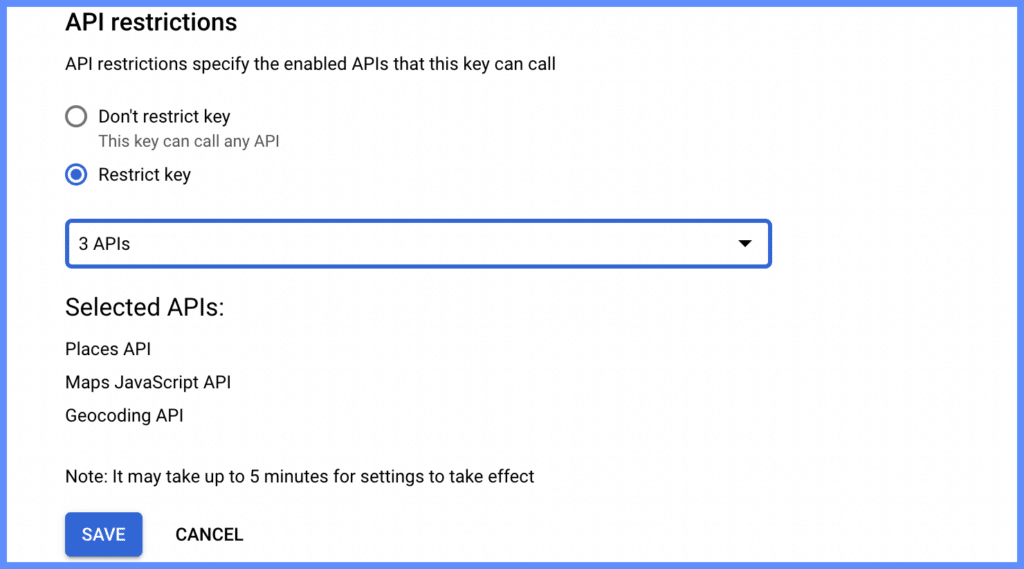
- Under API Restrictions, select Restrict Key and choose the APIs you just enabled.
Step 2: Add your API key to your WooCommerce store
- Install the CheckoutWC plugin.
- Navigate to CheckoutWC > Integrations.
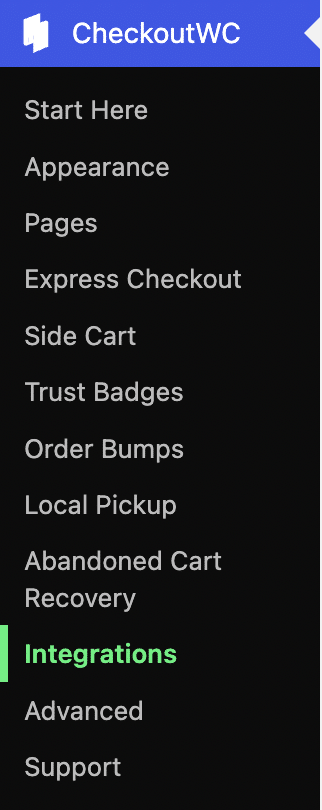
- Find the Google API Key field and paste your key.

- Save your changes.
There you have it! You’ve successfully retrieved your Google Maps API key and added it to your store.
Step 3: Setting up Google Address Autocomplete with CheckoutWC
CheckoutWC handles all the technical integration with Google’s API behind the scenes. This means you don’t need to worry about the nitty-gritty of API calls or response handling. It’s all taken care of for you.
To enable Google Address Autocomplete with CheckoutWC, follow these steps:
- Make sure CheckoutWC is installed and activated on your WordPress site.
- In your WordPress admin panel, find CheckoutWC in the left sidebar.
- Navigate to Pages, and you should land on the Checkout tab by default.
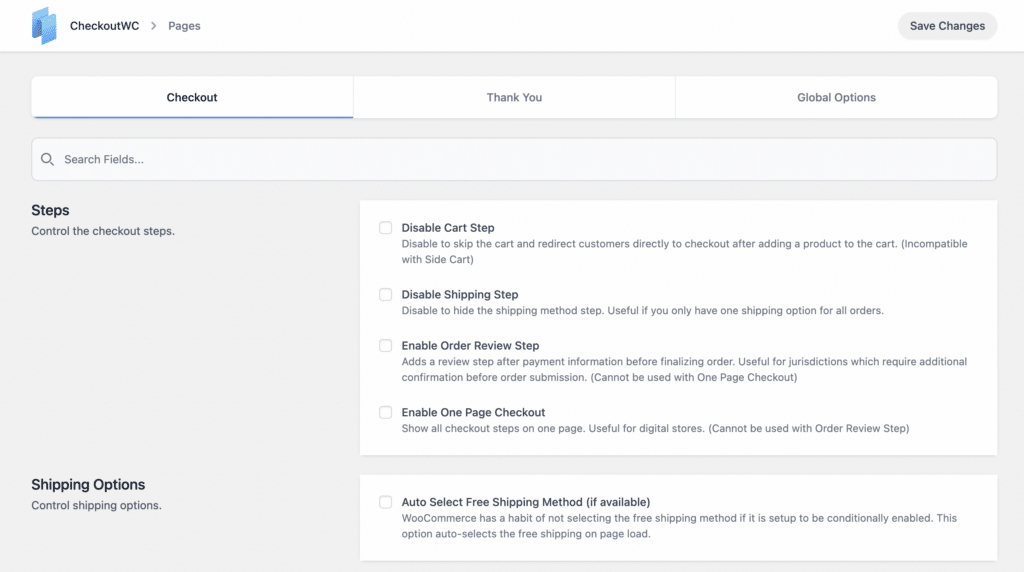
- Scroll down until you find the Address Completion and Validation section.

- Look for the Enable Google Address Autocomplete option and check the box next to it.

- Don’t forget to hit the Save Changes button once you’re done!
Step 4: Testing your Address Autocomplete functionality
Now that you’ve set everything up, it’s time to make sure your Address Autocomplete is working properly. Let’s do a quick test.
Head over to your checkout page and start typing an address in the billing or shipping fields. If everything’s set up correctly, you should see address suggestions popping up as you type.
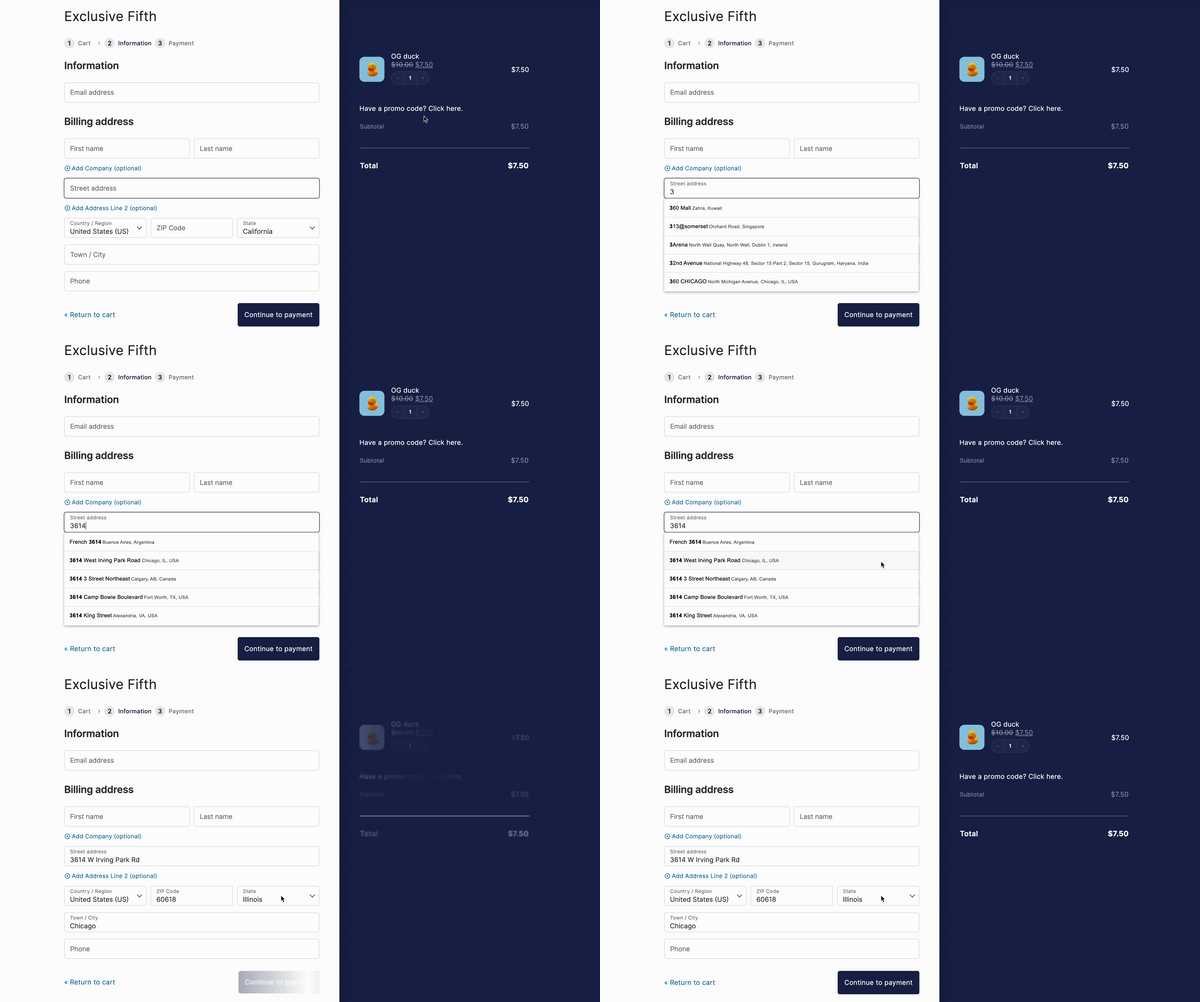
However, if it’s not working quite right, you’ll see something like this on your checkout page:
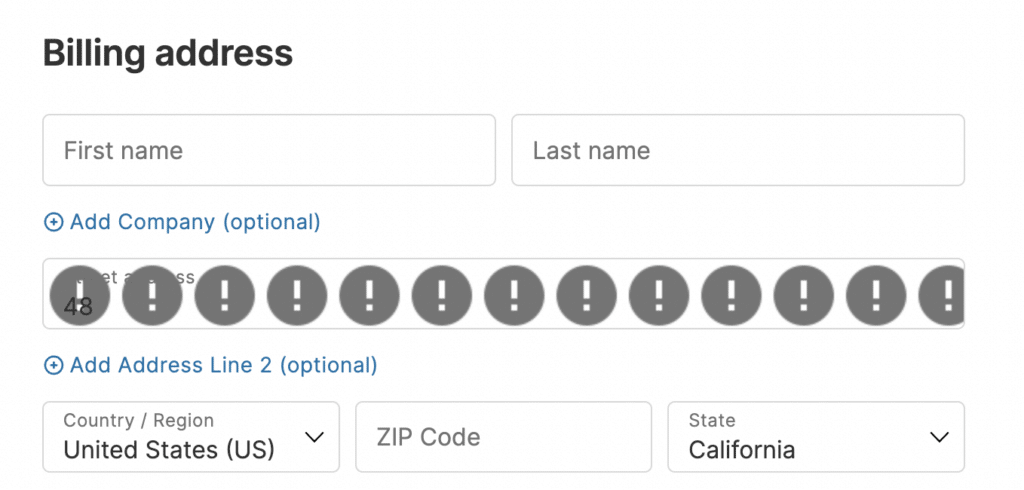
This issue is likely related to your API key configuration. Juan Machado, Support at Kestrel, shares some common problems:
“When things aren’t working right, it’s usually down to API key problems or Google Cloud Project settings. We often see issues like API keys not being allowed on the site, missing access to Maps or Places APIs, or billing not being set up properly. Sometimes, it’s as simple as a performance plugin accidentally blocking Google Maps. If you start by checking these areas, you’ll usually find the culprit pretty quickly.”
Need to troubleshoot? CheckoutWC provides a detailed guide to help you resolve any Address Autocomplete issues you might face.
Step 5: Customizing Google Address Autocomplete in your WooCommerce store
If you want to fine-tune your Address Autocomplete implementation, country restrictions are a powerful customization option. Maybe you’re focusing your marketing efforts on specific regions, or perhaps there are certain countries where you’re not legally permitted to ship your products.
Either way, country restrictions help you create a more focused checkout experience by bringing two clear benefits. First, it prevents errors by ensuring Google won’t suggest addresses you can’t ship to. Second, it speeds up the address selection process by limiting suggestions to relevant locations.
For example, if your store only ships to the US and Canada, you can restrict Address Autocomplete to these countries. CheckoutWC makes this simple with built-in country restriction settings.
P.S. When implementing country restrictions for Address Autocomplete, remember to update your WooCommerce shipping settings to match. This ensures consistency across your entire checkout process.
If you’re interested in more advanced customizations beyond country restrictions, we recommend partnering with experienced developers familiar with our platform. These experts can help implement more complex modifications to optimize your checkout experience.
Upgrade your WooCommerce checkout experience today
Google Address Autocomplete does a great job of speeding up checkout, getting addresses right, and making things easier for your customers. And as we’ve seen, setting it up with CheckoutWC is straightforward.
One thing that really stands out? It works great on mobile. With so many people shopping on their phones these days, Address Autocomplete keeps things running smoothly no matter what device your customers are using. Plus, faster, more accurate checkouts often result in fewer abandoned carts and more completed purchases.
So, what are you waiting for? Get started with CheckoutWC and try Address Autocomplete for your WooCommerce store today!
The simplicity of Shopify with the power of WooCommerce. Replace your WooCommerce checkout page with CheckoutWC to boost sales and reduce cart abandonment.